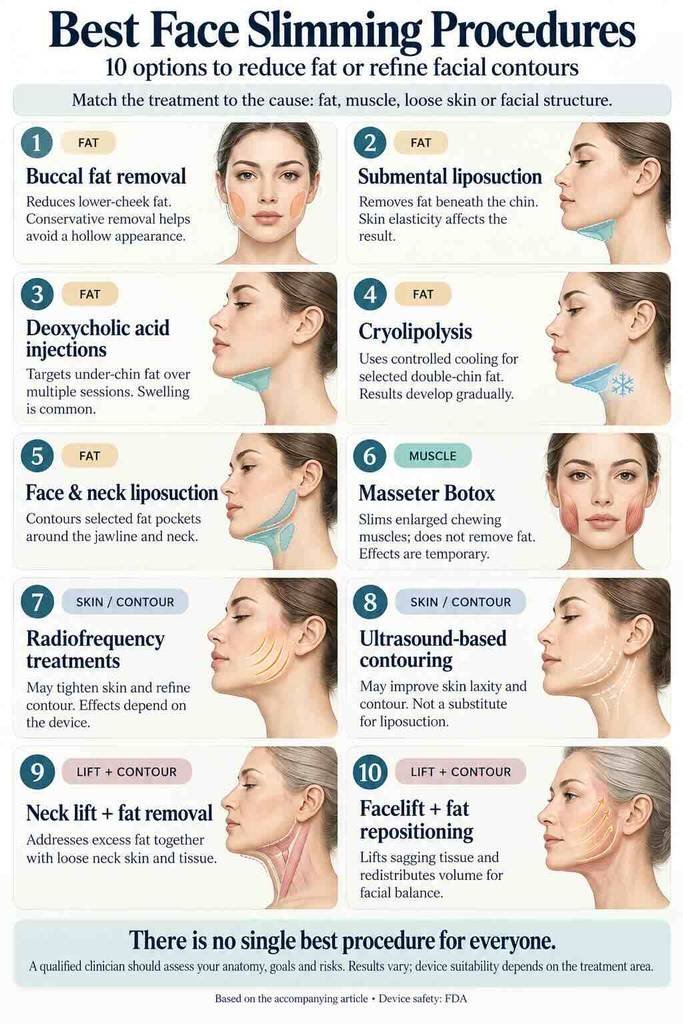
Face slimming procedures reduce facial fat, relax enlarged jaw muscles, or tighten loose skin to create a slimmer, more defined face. Diet and exercise can’t target fat in one area of the face. The right procedure depends on what causes the fullness: fat, muscle, skin laxity, or bone structure.
What causes a full or rounded face?
A rounded face has four main causes. Each cause points to a different treatment.
Bone structure also shapes the face. A recessed chin can make a small amount of fat beneath the chin look larger. Most patients have more than one cause, so a treatment plan often combines two procedures.
How do the 10 face slimming procedures compare?
Procedure
Best for
Surgical?
Downtime
Duration
Masseter Botox
Wide jaw
No
None
4–6 months per treatment
Deoxycholic acid injections
Small double chin
No
3–7 days of swelling
Long-lasting after full series
Cryolipolysis
Mild double chin
No
Minimal
Long-lasting after sessions
Radiofrequency
Mild fat plus loose skin
No
Minimal
Months; needs maintenance
Ultrasound contouring
Mild laxity
No
Minimal
Months; needs maintenance
Buccal fat removal
Round lower cheeks
Yes
1–2 weeks
Permanent
Submental liposuction
Double chin with elastic skin
Yes
About 1 week
Permanent at stable weight
Face and neck liposuction
Fat in several areas
Yes
1–2 weeks
Permanent at stable weight
Neck lift with fat removal
Fat plus loose neck skin
Yes
About 2 weeks
Years
Facelift with fat repositioning
Age-related sagging
Yes
2–3 weeks
Years
The list below runs from least invasive to most invasive.
Non-surgical face slimming treatments
Non-surgical treatments slim the face gradually with little or no downtime. Results are modest compared with surgery, and most options need several sessions.
1. How does masseter Botox slim the jaw?
Masseter Botox slims the jaw by relaxing the masseter, the main chewing muscle. A relaxed muscle shrinks over several weeks, which narrows a square lower face. The treatment removes no fat, so it only helps when muscle drives the face shape.
Studies show consistent results. In one of the largest studies, covering 1,021 patients, muscle thickness dropped by 31%, the peak effect arrived at 10–12 weeks, and half of patients needed a second injection after 4–7 months. A randomized trial of 187 subjects found lower-face volume reduction held for up to 6 months after each of two treatments. wileyjaad
Masseter Botox is an off-label use in the US. Patients who clench or grind their teeth often notice a functional benefit too.
Dr. K’s take: A good first step when the jaw has widened over time from clenching.
2. How do deoxycholic acid injections reduce a double chin?
Deoxycholic acid injections (brand name Kybella) destroy fat cells beneath the chin. The body clears the destroyed cells over the following weeks. The FDA approved this injection specifically for submental fat.
Clinical trials support its use. The two pivotal trials, REFINE-1 and REFINE-2, enrolled 1,022 patients who received up to 6 treatments. In REFINE-1, 70% of treated patients improved by at least one grade on both clinician and patient scales, compared with 18.6% on placebo. Across both trials combined, 68.2% of treated patients improved by at least one clinician-rated grade, compared with 20.5% on placebo. Deoxycholic Acid for Submental Fat – Rejuvenation Resource +2
Swelling is the main trade-off. Bruising, injection pain, and firmness were common in the phase III trials, and 4.3% of patients had temporary nerve weakness that resolved on its own. ajops
Dr. K’s take: Best for a small, well-defined pocket of fat, not loose skin or neck bands.
3. Does cryolipolysis work for chin fat?
Cryolipolysis (brand name CoolSculpting) freezes and destroys fat cells under the chin without needles or incisions. Fat cells are more sensitive to cold than surrounding tissue, so the skin stays unharmed.
In a 60-patient study, blinded physicians identified baseline photos correctly 91% of the time, ultrasound showed an average fat reduction of 2.0 mm, and 83% of patients were satisfied. These results led to FDA clearance for submental treatment. A meta-analysis of eight studies and 206 patients found an average fat thickness reduction of 2.78 mm. nihresearchgate
These numbers show a real but modest change. Cryolipolysis suits mild fullness in patients with good skin tone.
Dr. K’s take: A reasonable option if you’re comfortable with a subtle result.
4. What does radiofrequency do for face fat?
Radiofrequency heats tissue beneath the skin to reduce small amounts of fat and stimulate collagen. The collagen response tightens skin over several months. Some radiofrequency devices combine heat with microneedling for deeper treatment.
Radiofrequency fits patients with mild fat plus mild laxity. It can’t match surgical fat removal or a lift, and results need maintenance sessions.
Dr. K’s take: Helpful for mild laxity, but no device replaces surgery for significant fat or sagging.
5. How does ultrasound facial contouring work?
Ultrasound contouring (such as Ultherapy) focuses energy on deep tissue layers to tighten skin along the jaw, chin, and neck. It targets laxity more than fat, so it improves definition without removing volume.
Visible tightening develops over two to three months. Temporary tenderness and swelling are common.
Dr. K’s take: Works best when the diagnosis is right. Treating the wrong tissue layer causes most disappointing results.
Surgical face slimming procedures
Surgical procedures remove fat directly or reposition tissue. Results are larger and longer-lasting than non-surgical treatments, with more recovery time.
6. What is buccal fat removal?
Buccal fat removal, also called cheek reduction surgery, removes part of the buccal fat pads between the cheekbones and jaw. The surgeon works through a small incision inside the mouth, so no external scar forms. Removed buccal fat does not grow back.
Buccal fat pad size varies by genetics, so some people keep round cheeks at any weight. These patients are the best candidates. Patients with thin faces are poor candidates, because cheek volume naturally decreases with age.
Swelling lasts one to two weeks, and the final shape appears over about three months. This Harvard Health guide covers more on recovery.
Dr. K’s take: Less is more. Over-removal can look gaunt as the face ages.
7. What is submental liposuction?
Submental liposuction removes fat beneath the chin through incisions a few millimeters long. Double chin liposuction works best for patients with elastic skin, because the skin needs to tighten over the new contour.
Removed fat cells don’t return, so results last as long as weight stays stable. Most patients wear a compression garment for about a week.
Dr. K’s take: Chin projection matters as much as fat. Sometimes the best result comes from treating the whole profile.
8. When is face and neck liposuction the better choice?
Face and neck liposuction treats several areas in one procedure, such as the chin, jawline, jowls, and upper neck. It fits patients with fat spread across the lower face rather than one small pocket.
Neck liposuction combined with jawline treatment creates a sharper angle between the jaw and neck. The goal is smooth transitions, not a carved look.
Dr. K’s take: Facial fat also supports the face. Conservative removal keeps results natural for years.
9. When does a neck lift beat liposuction?
A neck lift beats liposuction when excess fat comes with loose skin or visible neck bands. Liposuction removes fat but leaves lax skin behind. A neck lift removes fat, tightens the platysma muscle, and trims excess skin in a single procedure.
Incisions sit under the chin and behind the ears. Most patients return to normal activities in about two weeks.
Dr. K’s take: If you can pinch loose skin under your chin, liposuction alone probably won’t give you the contour you want.
10. How does a facelift slim the face?
A facelift slims the face by lifting sagging tissue and repositioning fat that has descended with age. Jowls often make the lower face look wider. Lifting them restores a slimmer, more defined jawline.
A facelift can also remove fat from areas with excess. Repositioning often looks better than removal, because aging shifts fat downward rather than adding it.
Recovery takes two to three weeks, and results last for years.
Dr. K’s take: Aging usually moves fat, not adds it. Putting it back in place keeps the face youthful and balanced.
Face slimming FAQ
What is the best face slimming procedure? The best face slimming procedure matches the cause of fullness. Buccal fat removal treats round cheeks. Liposuction treats a double chin. Botox treats a wide jaw. A lift treats loose skin.
Are face slimming results permanent? Surgical fat removal is permanent at a stable weight, because removed fat cells don’t regrow. Botox lasts about four to six months. Energy-based treatments need maintenance.
Can I combine face slimming procedures? Yes. Common combinations include buccal fat removal with chin liposuction, and a neck lift with jawline liposuction.
How much does face slimming cost? Cost depends on the procedure, anesthesia, and whether treatments are combined. A consultation provides an exact quote.
Who is a good candidate? Good candidates are at or near a stable weight, in good health, and have realistic expectations. Weight changes after surgery can alter results.
How to get started
Dr. Bart Kachniarz trained at Harvard and Johns Hopkins and focuses on natural results that keep facial features in balance. A consultation identifies what causes your facial fullness and which procedure fits. Schedule a consultation with Dr. K Miami.
Dimpling is a visible indentation or puckering of the skin, and its meaning depends on where it appears, how long it has been present, and what other changes accompany it.
Dimpling can be a natural feature, a temporary pressure mark, or a sign of changes in tissue beneath the skin.
Skin, fat, connective tissue, ligaments, and muscle all influence the way an indentation looks.
Breast dimpling that is new, persistent, or paired with other breast changes should be evaluated by a healthcare professional.
Diagnosis may involve a physical examination, imaging, and sometimes a biopsy or other testing.
Treatment is guided by the underlying cause; some dimples need no treatment, while others may call for medical, surgical, or cosmetic care.
What dimpling means and where it can occur
When people ask, “What Is Dimpling,” they are usually describing a small hollow, puckered area, or uneven texture on the skin. It may be barely noticeable or clearly visible, especially when the body moves or the skin is stretched. Dimpling can occur on the cheeks, chin, thighs, buttocks, breasts, abdomen, or around a scar. The appearance alone does not identify the cause.
How dimpling changes the appearance of the skin
Dimpling interrupts the usual smooth contour of the skin. A single indentation may look like a shallow depression, while several closely spaced depressions can create a rippled or pitted texture. Lighting, posture, muscle tension, and the angle from which the skin is viewed can all make the change seem more or less pronounced.
Some dimples are symmetrical and longstanding, which often makes them part of a person’s normal appearance. Others develop because tissue beneath the skin is pulling inward or because swelling changes the contour around it. The pattern and timing matter as much as the indentation itself, particularly when the change is new.
Common types of dimpling, including breast and facial dimples
Facial dimples are commonly seen in the cheeks or chin and may become more obvious with smiling or certain expressions. They can reflect the way facial muscles and connective tissues are arranged. Thigh and buttock dimpling is often associated with cellulite, a common surface-texture change that can appear across many body types.
Breast dimpling describes an indentation or puckered texture affecting breast skin. It may look like tiny pits or an orange-peel surface, sometimes called peau d’orange. A new breast-skin change deserves more attention than a stable facial dimple because breast dimpling can have several possible causes, including conditions that need prompt assessment.
Temporary dimpling versus persistent skin indentation
Temporary dimpling often follows pressure from clothing, bedding, a hand, or a prolonged position. It generally fades as circulation and tissue shape return to normal. Dimpling can also appear briefly when a person flexes a muscle, changes posture, lifts an arm, or makes a facial expression.
Persistent indentation remains in the same area or repeatedly returns without an obvious position-related explanation. A scar, tethered connective tissue, a change in fat, inflammation, or a deeper structural process may contribute. If the skin does not return to its usual appearance or the area is steadily changing, documenting it and arranging an evaluation is sensible.
Why new or changing dimpling deserves attention
A new indentation is a change from your personal baseline, so it is worth observing rather than dismissing. This does not mean that every new dimple is dangerous. It does mean that location, duration, associated symptoms, and recent events such as injury or surgery should be considered together.
Breast changes are especially worth discussing with a clinician. A useful breast skin changes guide can help explain why dimpling may have benign causes as well as causes that require further investigation, but online information cannot determine what is happening in an individual person.
The anatomy behind skin dimpling
Skin dimpling becomes easier to understand when the surface is viewed as part of a layered structure rather than as an isolated sheet. Skin lies over connective tissue and fat, with muscles, glands, blood vessels, and other structures beneath or within those layers. The layers can move together in some places and independently in others. Differences in this arrangement help explain why an indentation may be fixed, movement-related, or visible only under certain conditions.
How skin, fat, connective tissue, and muscle interact
The outer skin contains fibers that provide strength and elasticity. Underneath it, fat contributes volume and soft contour, while connective tissue helps hold neighboring structures in place. Muscle movement can shift the skin above it, and changes in muscle tension can temporarily reveal contours that are not obvious at rest.
If one layer loses volume, becomes swollen, or adheres more firmly to another layer, the surface may look uneven. The same visible dimple can therefore arise from very different mechanisms. A clinician evaluates the texture and movement of the area to understand which layers may be involved.
The role of ligaments and tissue tethering
Fibrous bands and ligaments connect the skin and deeper tissues in many parts of the body. Where these bands are short, tight, or attached at different depths, they can pull the skin inward and create a dimple. This is one reason some natural dimples become more visible with a smile or a change in position.
Tethering can also develop after healing. Scar tissue may contract as it matures, drawing nearby skin toward a deeper structure. In the breast, a deeper process can sometimes pull on supporting tissue and alter the surface. That finding is not a diagnosis by itself, but it is one reason a new indentation should be examined.
Why dimpling may appear when you move or change position
Movement changes the relationship between skin, fat, fascia, and muscle. Raising an arm can stretch breast tissue, flexing a thigh can tighten the underlying muscle, and smiling can activate facial muscles that reveal a cheek dimple. A contour that disappears when the muscle relaxes is often different from one that remains fixed.
Checking the area in more than one position can provide useful information, but repeated manipulation should not replace professional assessment. Note whether the indentation is present at rest, appears with movement, or changes when the skin is gently stretched. These observations can help a clinician understand the pattern.
How anatomy differs across the breast, face, thighs, and other areas
The breast contains skin, fat, glandular tissue, ducts, and connective structures, so a surface change may relate to any of several layers. Facial dimples are more closely tied to muscle movement and local anatomy. Thigh and buttock texture is often influenced by the arrangement of fat and fibrous bands, while a scar may create a sharply localized pull wherever it occurs.
That location-specific anatomy is why the same word—dimpling—does not describe one single condition. A healthcare professional considers the body area, age of the change, previous procedures, injuries, and accompanying symptoms before suggesting what to do next.
What causes dimpling
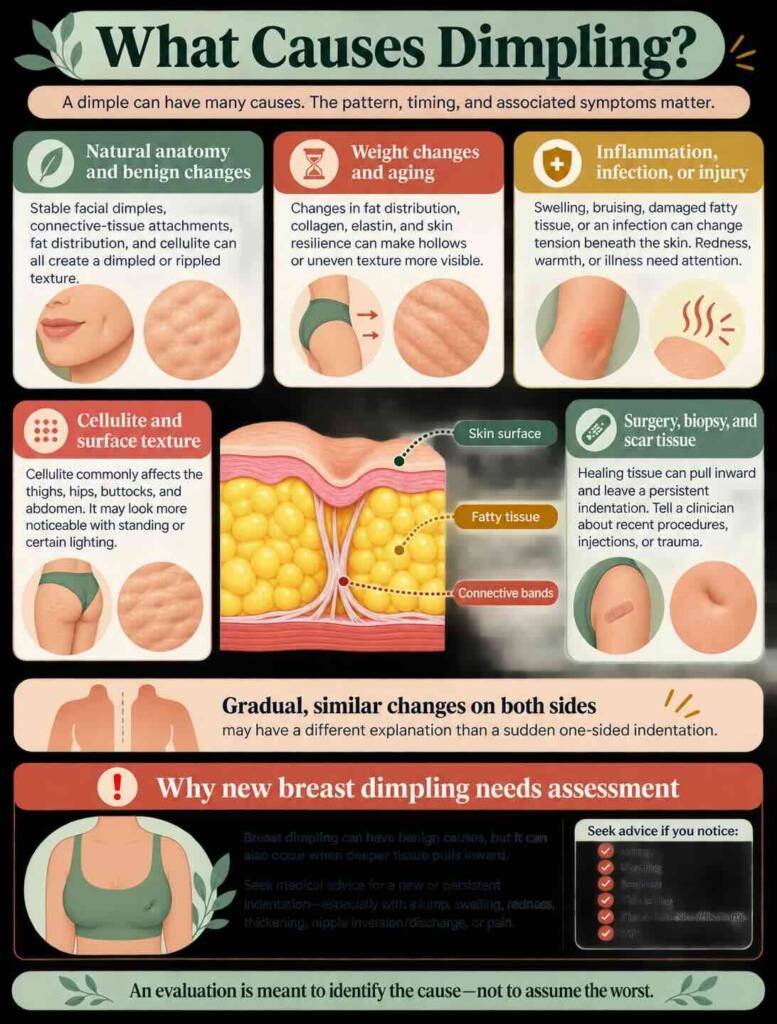
Dimpling has a broad range of causes. Some are natural variations in anatomy, while others follow changes in weight, aging, inflammation, injury, surgery, or scar formation. Breast dimpling deserves particular care because harmless tissue changes and more serious breast conditions can sometimes look similar from the outside.
The safest approach is not to guess from appearance alone. Instead, compare the area with its usual appearance, consider recent events, and seek an examination when the change is new, persistent, or accompanied by other symptoms.
Natural or benign causes of dimpling
Some dimples are present for years and remain essentially unchanged. Facial dimples are a familiar example, but small stable indentations can occur elsewhere because of normal differences in connective-tissue attachments or fat distribution. Cellulite is another common, noncancerous reason skin may look dimpled or rippled.
Benign breast conditions may also change the contour of the skin. Cysts, fibrocystic changes, inflammation, or damaged fatty tissue can affect the tissue beneath the surface. “Benign” means noncancerous, not that every unexplained change should be ignored; a clinician may still need to confirm the cause.
Weight changes, aging, and changes in skin elasticity
Weight gain or loss can alter the amount and distribution of fat beneath the skin. A rapid change may make existing bands, hollows, or irregularities more visible. Aging also gradually affects collagen, elastin, fat volume, and skin resilience, which can change the way the surface settles over deeper structures.
These changes are often gradual and may affect both sides of the body in a similar way. A one-sided indentation that appears suddenly is less easily explained by ordinary aging or weight change. The pattern, pace, and symmetry remain important clues.
Inflammation, infection, injury, and scar tissue
Inflammation can cause swelling and alter the tension across the skin. Infection may add redness, warmth, tenderness, or a feeling of illness. A bruise or direct injury can damage fatty tissue, and procedures such as surgery or biopsy may leave scar tissue that pulls the skin inward during healing.
The history surrounding the change can be revealing. Tell a clinician about recent trauma, injections, operations, biopsies, breastfeeding-related inflammation, or skin infections. A dimple that follows an injury may still need evaluation if it persists, becomes painful, or develops alongside a lump.
Cellulite and other surface-texture changes
Cellulite is a common cosmetic texture caused by the interaction of fat, skin, and fibrous connective bands. It often appears as shallow dimples or a softly rippled surface on the thighs, hips, buttocks, or abdomen. It may look more prominent when standing and less noticeable when lying down or stretching the skin.
Other surface changes include loose skin, stretch marks, and uneven healing after inflammation. These can affect appearance without indicating a dangerous disease. Even so, an area that changes quickly or looks substantially different from the surrounding skin should be assessed rather than automatically labeled cellulite.
Why breast dimpling can sometimes signal an underlying problem
Breast dimpling may occur when tissue beneath the skin pulls inward. In some cases, that tethering is associated with a breast tumor, although breast cancer can also present without a visible or palpable lump. Other possibilities include infection, inflammatory breast changes, fat necrosis, or benign breast disease.
Seek medical advice for a new breast indentation, especially if it persists or is joined by swelling, redness, thickening, nipple inversion, discharge, or a lump. Resources on breast dimpling symptoms describe the range of findings that may lead to an examination, imaging, or biopsy. The purpose of evaluation is to identify the cause—not to assume the worst.
How to recognize concerning dimpling
Concerning dimpling is usually defined by change and context rather than by size alone. A tiny new indentation may deserve more attention than a large dimple that has looked the same for many years. Look at the skin in good light and notice whether the appearance changes with movement, but avoid repeatedly pressing or pinching the area.
Breast skin deserves particular attention because visible changes can sometimes precede other symptoms. If you are unsure whether a change is meaningful, a clinician can compare the area with the rest of the breast and decide whether testing is appropriate.
Features that may require prompt medical evaluation
Arrange prompt medical evaluation for dimpling that is new, persistent, spreading, or associated with a firm area beneath the skin. A change that appears without a clear explanation, especially on one side of the breast, should not be postponed until it becomes painful. Pain is not required for a significant condition to be present.
Other warning features include a visible change in breast size or shape, swelling, skin thickening, redness, warmth, or a nipple that turns inward unexpectedly. These signs can have noncancerous explanations, but they warrant a proper assessment.
Dimpling with a lump, swelling, pain, or nipple changes
A lump near an indentation may be caused by many things, including a cyst, inflamed tissue, damaged fat, or a tumor. Pain and tenderness can occur with infection or inflammation, but they do not reliably distinguish harmless from serious causes. Nipple discharge, scaling, crusting, or new inversion adds another reason to contact a healthcare professional.
If these symptoms occur together, mention all of them when making the appointment. A short description such as “new dimpling” is useful, but timing, location, associated changes, and recent procedures make the clinical history more complete. Information about breast symptoms beyond lumps may also help readers recognize why a skin change merits attention.
Skin redness, warmth, thickening, or an orange-peel texture
Redness and warmth may point toward inflammation or infection, particularly when they develop quickly and are accompanied by tenderness or fever. Thickened skin or an orange-peel texture can result from swelling within the skin and underlying tissues. In the breast, this pattern should be evaluated promptly because several conditions can produce it.
Do not try to diagnose the cause from a photograph or comparison with someone else’s body. Skin tone, lighting, and normal anatomy vary widely. The most useful comparison is with your own previous appearance and with the opposite side when appropriate.
Differences between a stable indentation and a new change
A stable indentation generally has a long history, a predictable appearance, and no associated symptoms. It may appear only when you smile, flex, stand, or sit. A new change may remain visible at rest, become more pronounced over time, or feel different underneath.
Keeping a private photograph can help you compare changes over several days, provided the image is taken in consistent lighting and stored securely. Do not delay care while collecting a series of images. A clear new change is enough reason to arrange an appointment.
When to seek urgent care versus scheduling a routine appointment
A new breast dimple without severe symptoms usually calls for a prompt routine appointment with a healthcare professional rather than emergency care. Urgent assessment is more appropriate when the change comes with rapidly increasing swelling, marked redness and warmth, fever, severe pain, sudden bleeding, or a person feels acutely unwell.
When symptoms are mild but persistent, contact a primary care clinician, gynecologist, breast specialist, or other qualified healthcare professional. If you have recently had surgery, a biopsy, or an injury, include that detail when you call. Guidance on when breast dimpling needs evaluation can offer context, but it cannot replace an examination.
How dimpling is diagnosed
Diagnosis begins with a careful history and physical examination. The clinician may inspect the area at rest and during movement, feel the skin and tissue beneath it, and compare both sides of the body. The next step depends on the location, age of the patient, symptoms, examination findings, and relevant medical history.
Testing is not automatically necessary for every lifelong facial dimple or mild cellulite. It becomes more likely when the change is unexplained, persistent, associated with a lump, or located in breast tissue. The goal is to distinguish a normal variation from a condition requiring treatment or follow-up.
What to expect during a physical examination
During an examination, a clinician may ask you to sit, stand, raise an arm, smile, or change position so the skin can be observed under different conditions. They may gently feel for thickening, a lump, tenderness, warmth, or a tethered area. For breast concerns, the examination may include the breast, underarm, collarbone area, and nipple.
You can ask what the clinician is checking and what the possible next steps are. If the area is sensitive or you feel anxious, say so. A calm explanation of the examination can make the visit more manageable and help ensure that your concerns are fully addressed.
Questions a clinician may ask about timing and changes
Expect questions about when you first noticed the indentation and whether it has changed in size, depth, or color. The clinician may also ask about pain, fever, discharge, nipple changes, weight changes, pregnancy or breastfeeding, previous injuries, and recent procedures.
A family history of breast disease, current medications, and prior imaging may also be relevant. Before the appointment, write down the date you noticed the change and any symptoms that appeared before or after it. This small preparation can make the conversation more focused.
Imaging tests used for breast or soft-tissue dimpling
For breast dimpling, imaging may include diagnostic mammography or ultrasound, depending on age, symptoms, examination findings, and local clinical practice. Ultrasound can help evaluate a specific area of tissue, while mammography provides images of the breast in a different way. Other soft-tissue concerns may call for imaging selected for the body area and suspected cause.
Imaging does not always provide a final answer. A result may be reassuring, may call for short-term follow-up, or may identify an area that needs sampling. Ask the ordering clinician what each result means and when you should expect the next recommendation.
Finding or situation
Possible next step
Why it may help
Stable, longstanding dimple with no symptoms
Clinical observation
Establishes whether the feature is part of normal anatomy
New breast-skin change
Diagnostic breast imaging
Examines tissue beneath the visible change
Palpable lump or unusual imaging finding
Targeted ultrasound or additional imaging
Further characterizes a specific area
Persistent unexplained abnormality
Tissue sampling or specialist review
Helps identify the underlying tissue process
The table is a general guide, not a personal testing plan. A clinician chooses tests after considering the physical examination and the whole clinical history. Results should be interpreted together rather than in isolation.
When a biopsy or other testing may be recommended
A biopsy may be recommended when imaging or examination identifies a suspicious or unexplained area. During a biopsy, a small tissue sample is collected and examined by a laboratory. The type of biopsy and whether local anesthesia is used depend on the location and the clinical question.
Additional testing may be appropriate for suspected infection, inflammation, scar-related change, or other soft-tissue conditions. A recommendation for testing does not mean that cancer has been confirmed. It means that the cause needs a more definite answer.
Why photographs and symptom tracking can help
A dated photograph can show whether a visible indentation is stable, improving, or spreading. Use similar lighting, distance, and body position, and avoid sharing intimate images through unsecured channels. Written notes about pain, swelling, warmth, fever, discharge, or changes with movement can be equally useful.
Bring this information to the appointment if you have it, but do not feel that you must create a perfect record. A clinician can evaluate a current finding even when you did not photograph it at the beginning. Prompt communication matters more than detailed self-monitoring.
Dimpling treatment and management options
Treatment depends on what is producing the indentation. A natural facial dimple, mild cellulite, or a temporary pressure mark may not need medical treatment, while infection, inflammation, a scar, or a breast abnormality requires a different response. Treating the surface without understanding the underlying tissue can lead to disappointment or delay appropriate care.
A thoughtful plan also considers comfort, safety, expected improvement, recovery time, and whether the appearance may change again. For people considering aesthetic care, a consultation should be individualized rather than based only on a photograph or a general treatment menu.
When no treatment is needed
No treatment may be needed when the dimple is longstanding, stable, painless, and consistent with normal anatomy. The same can be true of uncomplicated cellulite when the person is comfortable with the appearance. Reassurance and observation may be all that is appropriate after a clinician has considered the relevant symptoms.
Choosing not to treat is still an active decision. It can include watching for changes, maintaining routine health appointments, and knowing which new symptoms should prompt a review. A stable feature should not be repeatedly manipulated in an attempt to make it disappear.
Treating the underlying cause rather than the indentation alone
If infection or inflammation is responsible, medical treatment is directed at that condition. If an injury has caused damaged fatty tissue, the area may be observed as it heals or evaluated further if a lump or persistent contour change remains. A scar-related indentation may soften over time, though some scars continue to contract or tether nearby tissue.
When breast dimpling has not been explained, the priority is diagnosis rather than cosmetic correction. At Dr. K Miami Plastic Surgery, consultations can be considered in the broader context of aesthetic plastic surgery and cosmetic procedures, but a new unexplained breast change should first receive appropriate medical evaluation.
Medical and surgical options for scar-related or structural dimpling
Treatment for a scar or structural indentation may include observation, scar care, injections, release of tethered tissue, fat grafting, revision surgery, or another procedure selected for the individual situation. Not every option suits every scar, and the location, depth, tissue quality, and prior operations all affect planning.
Dr. K Miami Plastic Surgery provides aesthetic plastic surgery and cosmetic procedures. If someone is considering an aesthetic procedure for a stable contour concern, an individualized consultation can address the potential approach, limitations, recovery, and safety considerations without treating an unexplained medical symptom as a cosmetic problem.
Cosmetic approaches for cellulite or natural dimples
Cellulite treatments may include changes in appearance produced by energy-based procedures, massage-based approaches, injectables, or surgery, depending on the treatment and the person’s goals. Results vary, and some methods require multiple sessions or maintenance. Exercise and general health habits may support overall well-being, but they do not reliably remove every structural dimple.
Natural facial dimples are usually left alone unless a person wants to alter their appearance for cosmetic reasons. Dr. K Miami Plastic Surgery approaches aesthetic plastic surgery and cosmetic procedures with attention to personalized outcomes, so a consultation should include an honest discussion of what can and cannot be changed.
What to know about treatment benefits, risks, and recurrence
A smoother contour is not guaranteed, and improvement may be partial or temporary. Possible risks vary by treatment but can include infection, bleeding, changes in sensation, contour irregularity, scarring, anesthesia-related complications, and the need for additional procedures. Even a technically successful treatment may not prevent a dimple from returning if the underlying tissue continues to change.
Ask about alternatives, expected recovery, aftercare, costs, and how complications would be handled. A qualified clinician should also explain when treatment should be postponed while a medical cause is investigated. The most appropriate plan balances appearance with safety and realistic expectations.
Conclusion
Dimpling is a description of skin appearance, not a diagnosis. It may reflect normal anatomy, pressure, cellulite, aging, inflammation, injury, scar tissue, or a deeper breast or soft-tissue problem. Pay attention to new or persistent changes, especially when they occur with a lump, swelling, redness, thickening, pain, or nipple changes, and arrange professional evaluation when appropriate.
Frequently Asked Questions
Is skin dimpling always a sign of cancer?
No. Dimpling can result from normal anatomy, cellulite, injury, inflammation, fat changes, or scarring. New or persistent breast dimpling should still be evaluated because cancer is one possible cause.
Can dimpling disappear on its own?
Temporary dimpling caused by pressure or position often fades. Indentations related to scars, tissue tethering, aging, or structural changes may persist.
Should I see a doctor about a new breast dimple?
Yes, contact a healthcare professional about a new or persistent breast-skin indentation. Seek more urgent advice if it occurs with swelling, redness, warmth, a lump, nipple changes, or fever.
How is breast dimpling diagnosed?
Diagnosis may involve a physical examination and breast imaging such as diagnostic mammography or ultrasound. A biopsy may be recommended if the examination or imaging shows an unexplained or suspicious area.
Can weight loss cause skin dimpling?
Weight loss can change the amount and distribution of fat beneath the skin, making existing contours or connective-tissue bands more visible. A sudden one-sided change should not automatically be attributed to weight loss.
Can dimpling be treated cosmetically?
Some stable cosmetic indentations or cellulite-related texture changes may be treated with nonsurgical or surgical approaches. The safest option depends on the cause, location, skin quality, goals, risks, and expected durability of the result.
Breast size can be influenced by body fat, breast tissue, hormones, genetics, and life stage. A steady, whole-body approach is safer and more realistic than trying to target one area.
Overall fat loss may reduce some breast volume, but results vary.
A moderate calorie deficit is more sustainable than a crash diet.
Cardio and resistance training can improve fitness and chest definition.
Bras, posture, and upper-body strength can change how the chest looks.
Sudden changes, pain, or a new lump deserve medical attention.
Understand what affects breast and chest fat
The phrase “boob fat” usually refers to only one part of breast size. Breasts contain a mixture of fatty tissue, glandular tissue, connective tissue, and skin, while the chest also includes the muscles beneath them. Understanding that difference helps set expectations before changing food or exercise habits.
The difference between breast tissue and stored fat
Some breast volume is made up of adipose, or fatty, tissue, which can change as overall body weight changes. Other volume comes from glandular and connective tissue, which does not respond to dieting in the same direct way. The pectoral muscles sit underneath the breasts, so strengthening them can affect the contour of the chest without removing breast tissue.
That is why weight loss may make a difference for one person but only a modest difference for another. The body does not treat the breasts as a separate fat depot that can be emptied on demand.
How genetics, hormones, age, and body composition play a role
Genetics influence breast shape, fat distribution, skin elasticity, and the way someone responds to weight change. Hormonal shifts during puberty, the menstrual cycle, pregnancy, breastfeeding, perimenopause, and menopause can also affect fullness and tenderness. Age and changes in body composition may alter both breast tissue and the skin that supports it.
Medications and health conditions can contribute as well. A change that feels unusual for you should not automatically be blamed on weight, especially if it happens quickly or affects only one side.
Why spot reduction is not usually possible
Exercises can strengthen particular muscles, but they cannot instruct the body to take fat from one chosen area. Fat loss occurs according to individual biology, with genetics influencing where fat is stored and where it tends to decrease first. A practical plan therefore focuses on sustainable habits for the whole body.
Whole-body progress matters more than chasing a single measurement.
When breast size may signal an underlying health issue
Breast enlargement is not always a cosmetic or weight-related concern. A new lump, unexplained swelling, nipple discharge, skin dimpling, persistent pain, or a sudden difference between the breasts should be assessed by a healthcare professional. Men and people assigned male at birth can also experience breast enlargement for reasons that need evaluation.
Do not use exercise or weight loss as a substitute for an examination when symptoms are new, persistent, or worrying. Prompt attention can clarify whether the change is hormonal, medication-related, benign, or something requiring treatment.
Set realistic goals for overall fat loss
If fat loss is appropriate for your health and circumstances, the most useful goal is gradual change across the body rather than a promise of a particular breast size. Progress may be measured in energy, strength, clothing fit, or health markers as well as pounds. Dr. K Miami Plastic Surgery takes a personalized approach to aesthetic transformation, so expectations should likewise be shaped around the individual rather than a fixed outcome.
How a sustainable calorie deficit supports fat loss
A calorie deficit means consistently using more energy than you consume, usually through a combination of food choices and activity. It does not require extreme hunger or eliminating entire food groups. Small adjustments, repeated over time, are easier to maintain and less likely to trigger a cycle of restriction and overeating.
The right approach depends on your size, activity, health, medications, and relationship with food. Someone who is pregnant, breastfeeding, recovering from an illness, or managing an eating disorder should seek tailored guidance before pursuing weight loss.
Choosing a safe and achievable rate of weight loss
There is no single ideal rate for everyone. A slower pace can help preserve routines, support training, and make it easier to maintain results. Rapid changes may also reflect fluid shifts rather than a meaningful change in body fat.
Rather than choosing an aggressive deadline, set behavior-based targets such as preparing more meals at home, walking regularly, or completing two strength sessions each week. Those habits provide useful feedback even when the scale pauses.
Tracking progress beyond scale weight
Body weight naturally moves up and down because of hydration, digestion, sodium, hormones, and muscle recovery. Looking at several measures gives a more balanced picture. Consider tracking the following without turning any one measure into a judgment:
Waist or chest measurements taken under consistent conditions.
How clothing fits across the shoulders, rib cage, and bust.
Strength, walking capacity, sleep, and day-to-day energy.
Photos taken occasionally with similar lighting and clothing.
These measures work best when collected over weeks rather than checked obsessively. If tracking increases anxiety, simplify the process and focus on how your body functions.
Why breast size may change differently from person to person
A person may lose inches from the waist before noticing a change in the breasts, or may notice breast-volume changes early. The difference reflects the proportion of fatty and nonfat tissue, genetics, age, hormones, and the amount of weight lost. No diet or workout can guarantee a specific reduction in breast size.
Keeping that uncertainty in mind can prevent disappointment. The goal is to improve health and comfort while allowing your body’s pattern of change to unfold.
Build an eating pattern that supports fat loss
Fat loss nutrition does not need to look like a short-term diet. A flexible eating pattern can include foods you enjoy while making room for adequate protein, fiber, fluids, and regular meals. The best plan is one you can repeat during ordinary weeks, travel, social occasions, and stressful periods.
Prioritizing protein, fiber, and minimally processed foods
Protein supports muscle maintenance, while fiber can help meals feel satisfying for longer. Vegetables, fruit, beans, whole grains, yogurt, eggs, fish, poultry, tofu, and nuts can all fit into a balanced pattern. Minimally processed foods are useful not because processed foods are forbidden, but because they often provide more volume and nutrition for the calories.
Try building meals around a protein source, a high-fiber carbohydrate or produce, and a moderate amount of fat. This simple structure is often more practical than following a long list of rules.
Managing portions without extreme restriction
Portion awareness can help create a deficit without making food feel morally charged. Use smaller serving dishes if that feels helpful, pause before taking seconds, and eat slowly enough to notice satisfaction. You can also adjust portions according to hunger, activity, and the nutritional density of the meal.
A flexible plan leaves room for favorite foods. Consistency over many meals matters more than making every plate perfect.
Choosing beverages and snacks that fit your goals
Liquid calories can add up without creating much fullness, particularly in sweetened drinks and frequent specialty coffees. Water, unsweetened tea, and other low-calorie choices may make a calorie deficit easier, though taste and routine still matter. Snacks can be planned rather than treated as failures.
Useful options include fruit with yogurt, vegetables with hummus, a boiled egg, or a small portion of nuts. The best choice is the one that satisfies you and fits the rest of your day.
Avoiding crash diets and unregulated “breast reduction” supplements
Very restrictive diets can leave you tired, hungry, and more likely to regain weight. Supplements marketed specifically for breast reduction may have unproven ingredients, misleading claims, or interactions with medications. “Natural” does not automatically mean safe, and supplements are not a reliable way to control where fat is lost.
If a product promises dramatic, targeted results with no effort, treat that as a warning sign. A registered dietitian or clinician can help you distinguish a reasonable plan from a risky one.
Use exercise to reduce overall body fat and improve chest definition
Exercise can support calorie use, cardiovascular health, strength, mood, and confidence. It may also improve the way the chest appears by developing the muscles underneath the breasts and encouraging better posture. It cannot directly remove breast tissue, so the purpose is improved overall fitness and shape rather than a guaranteed size reduction.
Combining cardio with resistance training
Cardio such as brisk walking, cycling, swimming, or dancing helps build endurance and increase energy expenditure. Resistance training supports muscle strength and can help maintain lean mass during weight loss. Combining the two is generally more useful than relying on endless cardio or chest exercises alone.
Start with an amount that feels manageable and increase gradually. Rest days are part of the plan, especially when muscles are sore or sleep is poor.
Chest-strengthening exercises for muscle tone
Push-ups, incline push-ups, chest presses, and chest flies train the pectoral muscles. Beginners can start with a wall or countertop variation and progress as control improves. A workout should challenge you without causing sharp pain in the shoulders, wrists, neck, or breasts.
For more accessible ideas, these at-home chest exercises include beginner-friendly variations. Treat them as strength work, not as a promise that exercise alone will reduce breast size.
Full-body movements that burn calories efficiently
Large muscle groups can make a workout feel more efficient while building useful everyday strength. Squats, step-ups, rows, carries, hip hinges, and modified plank movements can be adjusted for different fitness levels. Good technique is more valuable than rushing through a long session.
Choose movements that you can perform consistently. A short, focused session that you repeat is often more productive than an ambitious routine that causes injury or burnout.
How to create a beginner-friendly weekly routine
A simple week might include a few moderate walks, two nonconsecutive strength sessions, and gentle mobility work. Keep the first sessions short enough that you finish feeling capable rather than depleted. Over time, add minutes, repetitions, or resistance one change at a time.
For example, a routine could include walking on three days, full-body strength on two days, and rest or light mobility on the remaining days. Modify it around your schedule, health, and recovery.
Consider factors that can affect breast appearance
Breast appearance is shaped by more than fat. Posture, clothing, muscle development, skin elasticity, and the position of the breasts on the chest all affect what you see in a mirror or photograph. Some changes are temporary, while others remain after weight stabilizes.
The role of posture and upper-body muscle development
Rounded shoulders can make the chest look lower or heavier, while a comfortable upright posture may create a more lifted outline. Strengthening the upper back, shoulders, and chest can support posture and improve how clothing sits. It will not change the underlying breast tissue, but it can alter the overall silhouette.
Avoid forcing your shoulders backward or holding a rigid pose. Good posture should feel steady and relaxed, not painful.
How supportive, properly fitted bras can change appearance
A bra with an appropriate band and cup fit can improve comfort, support, and the way clothing falls. Sports bras may reduce movement during exercise, while everyday styles can offer different levels of shaping. Fit matters more than a particular label or style name.
If straps dig in, the band rides up, or breast tissue spills from the cups, a professional fitting may help. A supportive bra does not reduce breast tissue, but it can make movement and daily activities easier.
What to know about loose skin after weight loss
Skin does not always contract at the same rate as the body changes. Age, genetics, the amount and speed of weight loss, pregnancy history, and skin elasticity all play a role. Loose skin may become less noticeable over time, but exercise cannot reliably remove excess skin.
Give your weight time to stabilize before judging the final appearance. If loose skin causes discomfort or persistent distress, a qualified clinician can discuss appropriate options.
Why exercise cannot directly remove breast tissue
Chest exercises build muscle beneath the breasts; they do not selectively burn fat from the breasts or remove glandular tissue. Overall fat loss may reduce fatty breast volume, but the degree of change is unpredictable. Surgery is the only approach designed to physically remove breast tissue or skin.
At Dr. K Miami Plastic Surgery, consultations are part of a patient journey that includes support from the initial consultation through final follow-up. Any discussion of an aesthetic procedure should be based on your anatomy, health, goals, and safety—not on a promise of a particular result.
Know when to discuss breast size with a healthcare professional
A clinician can help separate normal variation from a change that needs investigation. This is especially useful when breast size changes suddenly, causes physical symptoms, or does not improve after an appropriate period of stable habits. Medical advice is also valuable before major dietary or exercise changes if you have a chronic condition or take regular medication.
Symptoms that warrant medical evaluation
Seek medical advice for a new lump, one-sided enlargement, nipple discharge that is not expected, skin dimpling, redness, persistent focal pain, or a noticeable change in shape. Men and women should take these symptoms seriously. Most breast changes are not cancer, but only an examination can determine the cause.
Urgent care may be appropriate for severe pain, signs of infection, or rapidly developing swelling. Do not wait for a weight-loss plan to address a concerning symptom.
How medications and hormonal changes may affect breast size
Hormonal contraception, hormone therapy, some psychiatric medicines, steroids, and other drugs may affect breast tenderness or size in some people. Pregnancy, breastfeeding, menstrual changes, thyroid disorders, and menopause can also alter the breasts. Never stop a prescribed medication without speaking with the prescriber.
Bring a list of medications and supplements to an appointment, along with when the change began. That information can make the evaluation more focused.
When gynecomastia may be involved
Gynecomastia is the growth of glandular breast tissue in males, often presenting as fullness or a firm area beneath the nipple. It can be associated with puberty, aging, medications, substance use, or hormonal and health conditions. Fat accumulation alone is different, though both may occur together.
A clinician can assess the tissue and decide whether testing, observation, medication review, or treatment is appropriate. Pain, a hard one-sided lump, nipple changes, or rapid growth deserves particular attention.
Medical and surgical options for persistent concerns
If breast size remains uncomfortable or distressing after weight and health factors are addressed, a consultation can clarify the available choices. Depending on the cause, options may include treating an underlying condition, adjusting a medication with medical supervision, or considering a surgical procedure. A qualified surgeon should explain risks, recovery, scars, expected changes, and alternatives.
Dr. K Miami Plastic Surgery provides aesthetic plastic surgery and cosmetic procedures with an emphasis on personalized outcomes, patient safety, comfort, and support. A consultation does not obligate you to treatment; it gives you a chance to ask questions and decide thoughtfully.
Conclusion
Losing breast fat is usually part of a broader process of managing overall body composition, not a matter of targeting one area with a special exercise or supplement. Sustainable eating, regular movement, realistic expectations, and medical attention for unusual changes provide a safer foundation. If breast size remains a persistent concern, personalized professional guidance can help you understand your options.
Frequently Asked Questions
Can losing weight reduce breast size?
It may, particularly when a portion of breast volume comes from fatty tissue. The amount of change varies with genetics, hormones, age, body composition, and the balance of fatty and glandular tissue.
Can I target boob fat with chest exercises?
No exercise can reliably direct fat loss to one body area. Chest exercises can strengthen the pectoral muscles and improve chest definition, but they do not directly remove breast tissue.
What is the safest way to lose overall body fat?
A moderate calorie deficit supported by balanced meals, regular activity, sleep, and recovery is generally more sustainable than severe restriction. Individual medical circumstances may require professional guidance.
How quickly will breast size change after weight loss?
There is no predictable timeline. Some people notice changes early, while others see little change until more overall weight is lost or their weight has remained stable for a while.
Do breast reduction supplements work?
Unregulated supplements have not been established as a dependable way to reduce breast size. They may contain undisclosed ingredients or interact with medications, so discuss them with a healthcare professional before use.
When should a breast-size change be checked by a doctor?
A sudden change, one-sided enlargement, new lump, persistent focal pain, nipple discharge, skin dimpling, redness, or rapid growth should be medically evaluated.
Can surgery reduce persistent breast size or discomfort?
Surgical procedures may be considered when breast size causes ongoing physical discomfort or significant concern. A qualified clinician can review your anatomy, health, goals, risks, recovery, and alternatives during a consultation.
The lymphatic system acts as your body’s natural waste-disposal network, filtering out toxins, cellular debris, and excess fluid to keep your immune defenses strong. During surgery, however, these delicate channels are temporarily disrupted, leaving the body unable to process fluid at its usual rate. This disruption results in the swelling, puffiness, and tissue hardness many patients experience after a procedure.
How surgery impacts lymphatic pathways
When a surgical incision is made, or when tissues are contour-sculpted during procedures like liposuction, the local microscopic lymphatic capillaries are severed. These tiny vessels normally suction up interstitial fluid and return it to the circulatory system. Without these pathways, fluid begins to pool in the open spaces left by the surgery, which is why managing this buildup is such a vital part of your recovery.
Identifying common signs of lymphatic congestion
Recognizing when your body is struggling to clear fluid is key to managing your healing timeline effectively. You might notice areas that feel unusually tight, heavy, or sensitive to the touch. This accumulation of fluid, or edema, can create a feeling of localized pressure. In some cases, the skin may appear shiny or stretched, indicating that the underlying tissues are under significant tension from blocked lymphatic fluid.
The difference between therapeutic massage and manual lymphatic drainage
It is incredibly important to understand that manual lymphatic drainage is entirely different from a standard therapeutic massage. Deep tissue work, or even standard Swedish strokes, increases local blood flow and applies heavy pressure, which can actually worsen swelling and damage healing tissues after cosmetic surgery. MLD uses an incredibly light, rhythmic touch to stimulate the superficial lymphatic vessels without dragging or putting pressure on the deeper muscles.
Key benefits of manual lymphatic drainage
Incoporating specialized post-surgical therapies is a highly effective way to support your body’s natural healing rhythm. When these light, sweeping strokes are applied correctly, they encourage the body’s internal filtration systems to kick back into gear. For many recovery plans, finding a dedicated partner in your healing process makes a world of difference.
Reducing post-operative swelling and edema
The most immediate and visible benefit of lymphatic therapy is a noticeable reduction in swelling. By clearing the congested fluid from the surgical site, the tissues can relax, which directly reduces the tight, heavy sensation. Initiating this gentle fluid movement can turn a highly uncomfortable, swollen recovery week into a much smoother path to your final results.
Enhancing tissue healing and circulation
When excess fluid blockages are cleared, oxygen-rich blood can flow more freely to the healing tissues. This improved microcirculation delivers essential nutrients and cellular building blocks to the incised areas. By keeping the circulation active through gentle techniques, your body can synthesize new collagen and repair tissues more efficiently.
Minimizing the risk of post-surgical fibrosis
After surgeries like liposuction, the body sometimes creates thick, fibrous bands of scar tissue beneath the skin. This can lead to a bumpy, uneven contour that compromises your final aesthetic result. Incorporating an early lymphatic massage in cosmetic procedures is a highly recommended strategy to keep the tissues soft, pliable, and smooth throughout the healing process.
Improving comfort and range of motion
When tissues are tight and swollen, moving around comfortably becomes a major challenge. Gently moving that fluid out of the limb or torso relaxes the skin and reduces pressure on local nerve endings. This reduction in tension allows you to stretch, walk, and perform daily tasks without the restrictive stiffness that so often accompanies the initial weeks of recovery.
Timing your sessions for maximum recovery
Getting the timing right is crucial when introducing helper therapies after a major cosmetic procedure. Starting too early can disrupt fresh incisions, while starting too late might allow fluid build-up to harden into stubborn tissue. A carefully structured timeline ensures you reap the maximum benefits without compromising your surgical site.
The importance of consulting your surgeon first
Before you book any therapeutic sessions, your primary surgeon must evaluate your incisions and overall healing. Every patient heals at a unique pace, and only your physician knows the precise details of how your internal tissues were modified. At Dr. K Miami Plastic Surgery, patients receive clear, personalized recovery guidelines that specify exactly when it is safe to begin touch therapies.
Starting during the early inflammatory phase
Many practitioners recommend starting very light lymph mobilization within the first week or two after surgery, provided there are no open wounds or complications. During this early inflammatory phase, the fluid is still relatively mobile and easy to redirect. Beginning sessions during this window helps prevent the initial swelling from reaching a peak that stretches and stresses your skin.
Adjusting session frequency based on recovery progress
In the beginning, you might benefit from multiple sessions per week to keep up with the fluid accumulation. As your swelling goes down and your body starts rebuilding its own lymphatic pathways, you can gradually reduce the frequency of your visits. To give you an idea of how a typical protocol is structured, consider this standard progression:
Phase of Recovery
Typical Weekly Frequency
Primary Recovery Focus
Weeks 1 to 2
2 to 3 sessions
Managing acute swelling and discomfort
Weeks 3 to 4
1 to 2 sessions
Preventing tissue hardening and fibrosis
Week 5 and beyond
1 session or as needed
Enhancing contour and smoothing tissue
This schedule is highly adaptable, and your practitioner will modify it depending on how quickly your body clears the underlying fluid.
Crucial safety guidelines and contraindications
While lymphatic drainage is exceptionally gentle, it is still a physical therapy that directly influences your circulatory and immune systems. Because of this, there are strict safety guidelines that must be followed. Understanding when to pause or avoid treatment altogether is essential for preventing serious medical complications.
Identifying early signs of infection or complications
Your therapist should always check your surgical sites before starting any touch therapy. If you display signs of a localized infection, such as extreme redness, localized heat, pus, or if you run a fever, massage of any kind must be avoided. Circulating lymphatic fluid during an active infection could potentially spread bacteria through your system, which is a major medical risk.
When to avoid massage over fresh surgical sites
There are times when direct touch over your incisions must be strictly avoided. If your wounds are still draining, or if you have an open area that has not fully closed, the therapist should work only on distant, unaffected lymph nodes to draw fluid away indirectly. Working directly on top of raw, healing incisions can cause tension on the skin edges and disrupt your external scarring.
Managing expectations regarding pain levels during treatment
Many patients assume that post-surgical therapies will be painful, but true manual lymphatic drainage should never hurt. The pressure applied is incredibly light—often described as a gentle brush or pump of the skin. If you undergo a session and feel deep, painful pressure, the therapist is likely using incorrect techniques that could cause internal bruising and fluid return.
Vital red flags to watch for during the healing process
You should always keep a close watch on how your body responds both during and after a session. To ensure a safe recovery, pay attention to these critical warning signs that mean you should stop treatment and contact your surgical team immediately:
Sudden, asymmetric swelling in only one leg or arm
Shortness of breath or an unusually rapid heart rate
Severe, sharp pain that does not improve with rest
Oozing of foul-smelling fluid from your incision lines
If you experience any of these symptoms, prioritize immediate medical evaluation to rule out deep vein thrombosis or severe infection before resuming any gentle bodywork.
Credentials to look for in a manual lymphatic drainage therapist
When researching providers, look for therapists who hold specific certifications in Manual Lymphatic Drainage (MLD) from reputable organizations, such as the Academy of Lymphatic Studies or the Vodder School. These certifications require intensive coursework and hands-on testing. Utilizing a practitioner with these exact credentials ensures they know how to work safely around delicate surgical areas.
Questions to ask about their specific post-plastic surgery experience
Do not hesitate to interview potential therapists before booking an appointment. Ask them how many post-operative cosmetic patients they treat each week and whether they have worked with individuals who have had your exact procedure. A qualified professional will comfortably explain their approach, how they modify their strokes for fresh incisions, and what safety checks they perform before starting.
The necessity of adhering to surgeon-approved protocols
A great therapist will always operate in alignment with your surgeon’s guidelines. Your surgical team understands the unique structural changes made during your procedure and is ultimate authority on your physical limits. Adhering closely to surgeon-approved guidelines ensures that your post-operative massage therapies support your newly sculpted contours rather than placing unnecessary stress on internal tissue repairs.
What to expect during your first appointment
Knowing what to expect during your first lymphatic session can help ease any pre-appointment anxiety. The clinic environment should feel incredibly clean, calm, and tailored entirely to your comfort. Because you are still healing, your therapist will guide you through every step with the utmost care.
Techniques used for gentle fluid mobilization
Your session will begin with the therapist gently clearing the main lymph node basins, which are usually located in the neck, armpits, and groin. Once these central stations are open, they will use slow, rhythmic, J-shaped strokes to sweep the excess fluid toward these areas. The movement is incredibly relaxing and often feels more like a light skin stretching than a traditional massage.
Comfort measures designed for post-surgical patients
Post-operative patients often struggle to lie flat on their backs or stomachs. A specialized clinic will offer supportive pillows, bolsters, and adjustable tables to keep you in a comfortable, semi-reclined position. Your therapist will also show you how to gently move and transition on the table to avoid putting any strain on your surgical wounds.
Self-care and hydration tips for after the session
Once your session is finished, you will need to drink plenty of water to help your kidneys flush out the mobilized fluid and cellular waste. You may also notice an increased need to urinate, which is a perfectly normal sign that the therapy is working. Resting quietly, wearing your prescribed compression garments, and keeping up with walking will help maintain the fluid movement achieved during your session.
Conclusion
Integrating manual lymphatic drainage into your post-plastic surgery recovery plan can significantly elevate your overall healing experience. By gently clearing fluid congestions, reducing swelling, and preventing the formation of stubborn scar tissues, this specialized therapy helps reveal your beautiful, contoured results more smoothly. Always remember to prioritize your safety by consulting your surgeon, selecting a certified practitioner, and listening closely to your body’s signals every step of the way.
Frequently Asked Questions
Is lymphatic drainage massage painful after plastic surgery?
No, professional manual lymphatic drainage should never be painful. The technique uses an incredibly light touch to move fluid just beneath the skin, which is designed to be deeply soothing and relieve pain rather than cause it.
How soon after my cosmetic procedure can I start sessions?
Many patients can begin gentle sessions as early as the first week after surgery, but this timeline depends entirely on your specific procedure, how well your incisions are healing, and when your plastic surgeon approves the therapy.
Can I perform lymphatic self-massage at home?
While very light strokes can sometimes be done at home under guidance, it is highly recommended to see a certified professional for your initial recovery. An experienced therapist understands how to safely navigate around fresh incisions and fragile tissues.
How many sessions of lymphatic massage will I need?
Most post-surgical patients benefit from a series of 5 to 10 sessions, but the exact number depends on the extent of your surgery, the amount of fluid retention, and how quickly your body clears the swelling.
Do I need to wear my compression garments during the massage?
You will take off your compression garments for the duration of the massage session so your therapist can access the skin, but you should put them back on immediately afterward to keep the fluid from returning.
What happens if I do not get lymphatic drainage after surgery?
While your body will eventually clear the fluid on its own, skipping lymphatic drainage may cause your swelling to linger much longer and increases the risk of developing localized fluid pockets or hard, fibrous tissue contours.
Are there any risks associated with lymphatic massage?
When performed by a certified therapist, lymphatic drainage is very safe. However, risks can arise if it is done over infected areas, active blood clots, or open, unhealed wounds, which is why surgeon clearance is mandatory.
Breast sagging affects nearly every woman at some point, yet it remains one of the most misunderstood concerns in aesthetic medicine. The causes range from factors you can control to those written into your DNA.
Whether you’re noticing early changes in your 30s or considering your options after pregnancy or weight loss, knowing what’s actually happening inside your body helps you make informed decisions. This guide covers the science behind ptosis, practical prevention strategies, and both non-surgical and surgical solutions available today.
What Are Saggy Breasts and Breast Ptosis
Breast sagging happens when skin elasticity and the supporting tissues inside your breasts weaken over time. The medical term for this is ptosis (pronounced TOE-sis), and it affects most women at some point in their lives. In fact, breast ptosis is one of the top concerns women bring up during plastic surgery consultations, with 153,616 breast lift procedures performed in 2024.
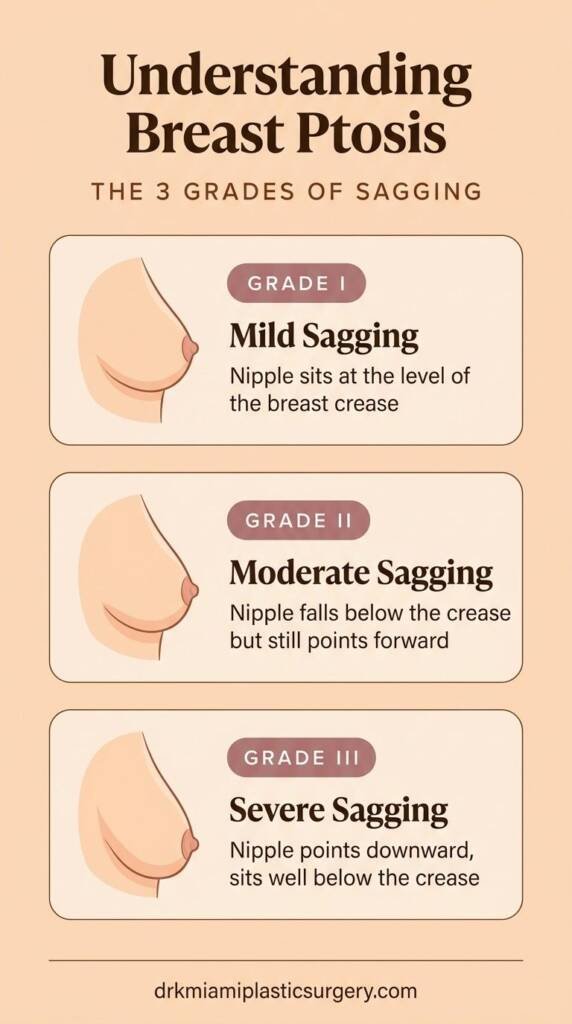
So how do surgeons actually measure sagging? They look at where your nipple sits compared to your inframammary fold, which is the crease where your breast meets your chest wall. If your nipple has dropped to or below this crease, you have some degree of ptosis.
The grading scale works like this:
Mild (Grade I): Your nipple sits right at the level of the breast crease
Moderate (Grade II): Your nipple falls below the crease but still points forward
Severe (Grade III): Your nipple points downward and sits well below the crease
Knowing where you fall on this scale helps determine which solutions might work best for you, whether that’s lifestyle changes, non-surgical treatments, or surgery.
What Causes Breasts to Sag
Sagging rarely comes from just one thing. It’s usually a combination of factors working together over time. Let’s break down what’s actually happening inside your body.
Aging and Loss of Collagen and Elastin
Your skin contains two key proteins: collagen, which provides structure, and elastin, which gives skin its bounce-back ability. After your mid-20s, your body produces less of both each year, and this decline speeds up significantly after menopause.
Then there are Cooper’s ligaments, the internal connective tissue that acts like a natural bra inside your breasts. These ligaments stretch and weaken with age. Once they lose their tension, they don’t tighten back up on their own.
Gravity and Cooper’s Ligaments
Gravity pulls on your breasts every single day. Over decades, this constant downward force gradually stretches both your skin and Cooper’s ligaments.
Larger breasts experience more gravitational pull, which is why women with fuller busts often notice sagging earlier, some may benefit from breast reduction to relieve that strain. That said, smaller breasts aren’t immune. They simply have less tissue weight pulling downward.
Pregnancy and Breastfeeding
Here’s something that surprises many women: breastfeeding itself doesn’t cause sagging. Research published in the Aesthetic Surgery Journal found no direct link between nursing and ptosis.
What does contribute is the repeated expansion and contraction of breast tissue during pregnancy and the postpartum period. Your breasts may increase by one or two cup sizes during pregnancy, then deflate after weaning. This stretching cycle affects skin elasticity over time.
Weight Fluctuations and Ozempic Breasts
Yo-yo dieting takes a real toll on breast tissue. Each time you gain and lose significant weight, your breast skin stretches and then struggles to snap back.
You may have heard the term “Ozempic breasts,” which describes sagging that occurs after rapid weight loss from GLP-1 medications. When you lose weight quickly, your skin simply cannot contract fast enough to keep up with the reduced breast volume, a loose skin pattern that often affects the abdomen as well.
Smoking and Sun Damage
Smoking accelerates skin aging throughout your body, including your chest. The chemicals in cigarettes break down collagen and elastin while restricting blood flow to the skin.
UV exposure causes similar damage, prolonged UV radiation accounts for 80% of visible signs of skin aging. Years of sun exposure without protecting your décolletage can lead to premature sagging and crepey skin texture on your chest.
Genetics and Breast Size
Some factors are simply inherited. Your natural skin elasticity, breast density, and ligament strength all come from your genetic blueprint.
If your mother or grandmother experienced early breast sagging, you may follow a similar pattern. However, lifestyle choices can still influence the timeline.
Why Saggy Breasts Happen at a Young Age
Sagging isn’t reserved for women over 50. Many women in their 20s and 30s notice changes, and this is completely normal, 26% of all breast lifts in 2024 were performed on patients in their 30s.
Common causes of early sagging include genetics, pregnancy during your 20s or 30s, significant weight loss, and high-impact exercise without proper support. If you’re experiencing sagging earlier than expected, effective solutions exist regardless of your age.
How to Prevent Saggy Breasts
You cannot completely stop sagging since it’s a natural part of aging. However, you can slow the process and maintain firmness longer with consistent habits.
Wear a Supportive Bra Daily
A well-fitted bra reduces the repetitive bouncing and stretching that wears down Cooper’s ligaments over time. This is especially important during exercise, when breasts can move significantly during high-impact activities.
Consider getting professionally fitted. Many women wear the wrong bra size without realizing it.
Protect Your Skin and Avoid Smoking
Apply SPF 30 or higher to your chest daily, even when you’re not at the beach. UV damage accumulates over years and contributes to premature skin laxity.
If you smoke, quitting can help preserve your remaining collagen and elastin. Your skin begins recovering within weeks of stopping.
Maintain a Stable Weight
Keeping your weight relatively stable helps your skin maintain its elasticity. Gradual changes give your skin time to adapt, while dramatic swings stretch the tissue repeatedly.
Strengthen Chest Muscles With Exercise
Push-ups, chest presses, and dumbbell flyes won’t lift your actual breast tissue, but they can improve the appearance of your chest by building the pectoral muscles underneath.
Think of it as creating a firmer foundation. The results are subtle but can make a noticeable difference, especially for mild sagging.
Non-Surgical Solutions for Saggy Breasts
For women with mild sagging who aren’t ready for surgery, several non-invasive options exist. These treatments provide modest improvement rather than dramatic transformation.
Radiofrequency and Ultrasound Skin Tightening
Treatments like Ultherapy and Thermage use energy to stimulate collagen production deep in the skin. Results develop gradually over 2 to 3 months as new collagen forms.
Most patients require 2 to 3 sessions spaced several weeks apart. These work best for mild laxity and cannot replicate surgical results.
Chest Strengthening Exercises
Building pectoral muscle creates a subtle lifting effect by improving the chest wall beneath your breast tissue. Consistency matters here. Aim for chest exercises 2 to 3 times per week for several months to see changes.
Topical Creams and Home Remedies
No cream, oil, or ice massage can tighten Cooper’s ligaments or lift breast tissue. These products may improve skin texture and hydration, which can make your chest look healthier, but they won’t reverse ptosis.
Surgical Solutions for Saggy Breasts
For moderate to severe sagging, breast enhancement surgery remains the only option that delivers dramatic, long-lasting results. Here’s what each procedure accomplishes.
Breast Lift Mastopexy
A breast lift removes excess skin and reshapes your existing breast tissue to raise the nipple position. This procedure is ideal if you’re happy with your breast size but want a perkier, more youthful shape.
Ptosis Level
Recommended Technique
Scarring Pattern
Mild
Crescent or periareolar lift
Minimal, around areola
Moderate
Vertical (lollipop) lift
Around areola plus vertical line
Severe
Anchor (inverted T) lift
Around areola, vertical line, and horizontal crease
Breast Augmentation With Implants
Implants add volume but provide limited lifting on their own. This option works best for women with mild sagging who primarily want fuller breasts.
Silicone implants—including teardrop implants shaped for a more anatomical contour—offer a more natural feel, while saline implants require smaller incisions. Your surgeon can help determine which type suits your goals.
Combined Breast Lift and Augmentation
Many women, especially after pregnancy or significant weight loss, experience both sagging and volume loss. A combined lift and augmentation addresses both concerns in a single surgery, delivering lifted position, restored fullness, and improved shape all at once.
Cost of a Breast Lift in Miami
Breast lift costs in Miami typically range from $8,000 to $15,000, depending on several factors:
Surgeon’s expertise: Board-certified plastic surgeons with specialized training often charge more
Facility fees: Accredited surgical centers with advanced safety protocols factor into pricing
Anesthesia type: General anesthesia costs more than local with sedation
Procedure complexity: Combined lift and augmentation costs more than lift alone
Most practices offer financing options. A consultation with your surgeon provides an accurate quote based on your specific situation.
Week 1: Rest at home, wear your compression garment continuously, avoid raising arms overhead
Weeks 2 to 3: Return to desk work, continue wearing your surgical bra, light walking encouraged
Weeks 4 to 6: Resume light exercise (no chest workouts yet), swelling continues to subside
Months 2 to 3: Final results become visible, scars begin fading from red to pink
Most patients feel comfortable in social situations by week 3, though strenuous activity waits until week 6 or later.
Restoring Firmness With Dr. K Miami Plastic Surgery
At Dr. K Miami Plastic Surgery, every breast lift begins with understanding your unique goals. Dr. Bart Kachniarz combines Harvard and Johns Hopkins training with an artist’s eye for natural-looking results. The goal is always a refreshed version of you, not an obvious procedure.
From your first consultation through final follow-up, you’ll receive personalized guidance at every step. Whether you’re a Miami local or traveling for your transformation, the entire experience is designed around your comfort, safety, and confidence.
Can saggy breasts become firm again without surgery?
Non-surgical methods like chest exercises and skin-tightening treatments can modestly improve appearance for mild sagging. However, only surgical procedures like a breast lift can significantly restore firmness and reposition the nipple for moderate to severe ptosis.
What is the 45-55 rule for measuring breast sagging?
This guideline refers to ideal nipple positioning, where the nipple sits between 45 and 55 degrees from the horizontal chest plane. Nipples falling below this range indicate ptosis that may benefit from surgical correction.
What are Ozempic breasts and why do they happen?
This term describes breast sagging that occurs after rapid weight loss from GLP-1 medications like Ozempic or Wegovy. When you lose significant weight quickly, your skin cannot contract fast enough to match the reduced breast volume.
At what age do most women start noticing breast sagging?
Most women begin noticing changes in their late 30s to 40s, though genetics, pregnancy, and lifestyle factors can cause sagging to appear earlier. Some women notice changes in their 20s, especially after pregnancy or significant weight loss.
How long do breast lift results typically last?
Breast lift results can last 10 to 15 years or longer, though natural aging, weight fluctuations, and gravity will gradually affect breast shape over time. Maintaining a stable weight and wearing supportive bras helps preserve results.